Building Your SIEM: Part 5 - Adding Graylog for Enhanced Log Management
Welcome to Part 5 of our SIEM construction journey! Today we're adding another powerful component to our security monitoring arsenal: Graylog. While we already have Wazuh handling our security analytics, Graylog brings exceptional log management capabilities that complement our existing setup perfectly. Think of it as adding a specialized forensics lab to your security operations center.
Why Add Graylog to Our SIEM Stack?
Graylog excels at ingesting, parsing, and analyzing massive volumes of log data from diverse sources. It provides powerful search capabilities, custom dashboards, and alerting mechanisms that work beautifully alongside our Wazuh deployment. Together, they create a comprehensive security monitoring ecosystem.
Version Note: We're installing Graylog 6.2, which you can upgrade later, but always check compatibility with OpenSearch first!
Step 1: Installing System Dependencies
Let's start by preparing our system with all the necessary dependencies:
sudo apt update
sudo apt install apt-transport-https openjdk-11-jre-headless uuid-runtime pwgen dirmngr gnupg wgetWhat we're installing:
apt-transport-https: Enables secure package downloadsopenjdk-11-jre-headless: Java runtime environment (Graylog's foundation)uuid-runtime: Generates unique identifierspwgen: Password generation utilitydirmngr&gnupg: Cryptographic tools for package verificationwget: File download utility
Step 2: Installing MongoDB (Graylog's Database Backend)
Graylog uses MongoDB to store configuration data, user information, and metadata. Let's install MongoDB 7.0:
sudo apt-get install gnupg curl
curl -fsSL https://www.mongodb.org/static/pgp/server-7.0.asc | \
sudo gpg -o /usr/share/keyrings/mongodb-server-7.0.gpg \
--dearmor
echo "deb [ arch=amd64,arm64 signed-by=/usr/share/keyrings/mongodb-server-7.0.gpg ] https://repo.mongodb.org/apt/ubuntu jammy/mongodb-org/7.0 multiverse" | sudo tee /etc/apt/sources.list.d/mongodb-org-7.0.list
sudo apt-get update
sudo apt-get install -y mongodb-org
sudo apt-mark hold mongodb-org
sudo systemctl daemon-reload
sudo systemctl enable mongod.service
sudo systemctl start mongod.serviceWhat's happening here:
- We download and verify MongoDB's GPG key for package authenticity
- Add MongoDB's official repository to our system
- Install MongoDB and prevent automatic updates (
apt-mark hold) - Enable and start the MongoDB service
Step 3: Installing Graylog Server
Now let's download and install Graylog itself:
wget https://packages.graylog2.org/repo/packages/graylog-6.2-repository_latest.deb
sudo dpkg -i graylog-6.2-repository_latest.deb
sudo apt-get update
sudo apt-get install graylog-serverThis adds Graylog's repository to our system and installs the server package.
Step 4: Configuring Administrator Access
Security first! Let's create a secure password hash for the admin account:
echo -n "Enter Password: " && head -1 </dev/stdin | tr -d '\n' | sha256sum | cut -d" " -f1This command:
- Prompts you to enter a password
- Generates a SHA256 hash of your input
- Returns the hash value you'll need for configuration
Keep this hash value safe - you'll need it in the next step!
Step 5: Core Graylog Configuration
Let's configure the main Graylog server settings:
sudo nano /etc/graylog/server/server.confKey configurations to set:
- Admin Password: Enter your hash from Step 4:
root_password_sha2 = [YOUR_HASH_FROM_STEP_4]-
Password Secret: Retrieve this from your Data Node configuration (see the official documentation)
-
HTTP Binding: Set where Graylog will listen for web requests:
http_bind_address = bonsaii.local:9000- OpenSearch Connection: Connect to our existing OpenSearch cluster:
elasticsearch_hosts = https://user:pass@bonsaii.local:9200Replace user:pass with your actual OpenSearch credentials!
Step 6: SSL Certificate Integration
This is where things get interesting - we need to make Graylog trust our OpenSearch SSL certificates.
Setting Up the Java Trust Store
mkdir /etc/graylog/server/certs
cp -a /usr/lib/jvm/java-11-openjdk-amd64/lib/security/cacerts /etc/graylog/server/certs/cacerts
keytool -importcert -keystore /etc/graylog/server/certs/cacerts -storepass changeit -alias root_ca -file <path/to/ca-certif/root-ca.crf>What's happening:
- Create a certificates directory for Graylog
- Copy the default Java certificate store
- Import our root CA certificate into the trust store
Note: Adjust the Java path (java-11-openjdk-amd64) to match your installed version.
Configuring Java SSL Options
Edit the Graylog server defaults:
nano /etc/default/graylog-serverAdd this crucial line:
GRAYLOG_SERVER_JAVA_OPTS="$GRAYLOG_SERVER_JAVA_OPTS -Dlog4j2.formatMsgNoLookups=true -Djavax.net.ssl.trustStore=/etc/graylog/server/certs/cacerts -Djavax.net.ssl.trustStorePassword=changeit"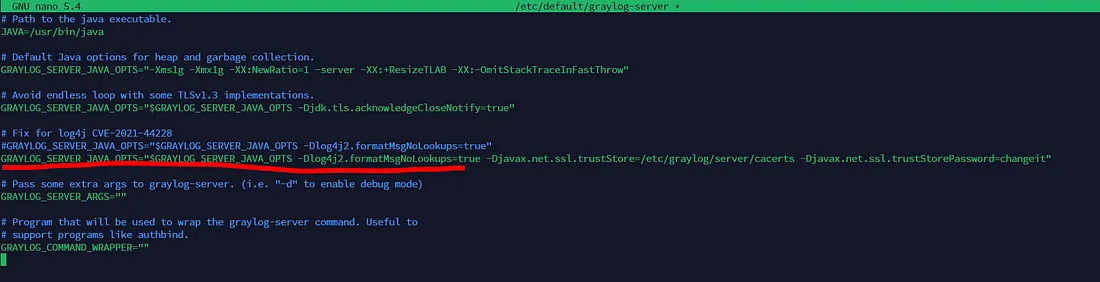
This tells Java where to find our trusted certificates.
Pro Tip: To remove a certificate alias later: sudo keytool -delete -alias <alias> -keystore /etc/graylog/server/certs/cacerts -storepass changeit
Step 7: Starting Graylog Services
Time to bring Graylog online:
sudo systemctl daemon-reload
sudo systemctl enable graylog-server.service
sudo systemctl start graylog-server.serviceStep 8: Setting Up HTTPS for Graylog Dashboard
For production security, we should enable HTTPS on Graylog's web interface. Let's create SSL certificates:
Creating the OpenSSL Configuration
Create openssl-client.cnf:
[ req ]
default_bits = 2048
prompt = no
default_md = sha256
distinguished_name = dn
req_extensions = req_ext
[ dn ]
C = MA
ST = casablanca
L = casablanca
O = bonsaii corporation
OU = IT-departement
CN = bonsaii.local
[ req_ext ]
subjectAltName = @alt_names
[ alt_names ]
DNS.1 = bonsaii.localCustomize the [ dn ] section with your organization's details.
Generating SSL Certificates
First, ensure you have a serial number file:
echo 01 > root-ca.srlNow generate the certificates:
# Generate private key for the server
openssl genrsa -out graylog.key 2048
# Generate CSR (Certificate Signing Request)
openssl req -new -key graylog.key -out graylog.csr -config openssl-client.cnf
# Sign the certificate with the CA
openssl x509 -req -in graylog.csr -CA root-ca.crt -CAkey root-ca.key \
-out graylog.crt -days 3650 -sha256 -CAserial root-ca.srl -extfile openssl-client.cnf -extensions req_extInstalling the Certificates
Copy the certificates to Graylog's directory and set proper permissions:
cp graylog.key /etc/graylog/server/certs/
cp graylog.crt /etc/graylog/server/certs/
chmod 400 /etc/graylog/server/certs/graylog.key
chmod 444 /etc/graylog/server/certs/graylog.crt
chown graylog:graylog /etc/graylog/server/certs/graylog.*Enabling HTTPS in Graylog
Edit the configuration file again:
sudo nano /etc/graylog/server/server.confAdd these HTTPS settings:
http_enable_tls = true
# The X.509 certificate chain file in PEM format to use for securing the HTTP interface.
http_tls_cert_file = /etc/graylog/server/certs/graylog.crt
# The PKCS#8 private key file in PEM format to use for securing the HTTP interface.
http_tls_key_file = /etc/graylog/server/certs/graylog.key
# The password to unlock the private key used for securing the HTTP interface.
#http_tls_key_password = secretStep 9: Version Management and Access
Prevent accidental updates:
sudo apt-mark hold graylog-serverImportant Compatibility Note: Graylog can be upgraded, but always check the compatibility matrix with OpenSearch first!
Step 10: Accessing Your Graylog Dashboard
Restart Graylog to apply the HTTPS configuration:
sudo systemctl restart graylog-server.serviceNow visit: https://bonsaii.local:9000
Log in with:
- Username:
admin - Password: The password you created in Step 4 (not the hash!)
What You've Accomplished
Congratulations! You now have:
- MongoDB storing Graylog's configuration and metadata
- Graylog Server processing and analyzing log data
- Secure HTTPS access to the Graylog web interface
- SSL integration with your existing OpenSearch cluster
- A complementary logging platform alongside your Wazuh SIEM
Next Steps: Maximizing Your SIEM Stack
With both Wazuh and Graylog running, you can:
- Set up log inputs in Graylog for various data sources
- Create custom dashboards for different security use cases
- Configure alerting rules for suspicious activities
- Establish log forwarding between Wazuh and Graylog
- Build correlation rules across both platforms
Troubleshooting Common Issues
Graylog Won't Start
Check the logs:
sudo journalctl -u graylog-server -fCertificate Issues
Verify certificate permissions and ownership:
ls -la /etc/graylog/server/certs/OpenSearch Connection Problems
Test connectivity:
curl -k https://bonsaii.local:9200MongoDB Issues
Check MongoDB status:
sudo systemctl status mongod